Step-by-Step: Setup and configure Active Directory Domain Services in Windows Server 2008 – Part 1
In case you haven’t known, IGX allows you to use external user authentication system. So that you can administrate one user database for several systems from different vendors. Active Directory Domain Services developed by Microsoft is a directory service for the Windows domain networks. It turns the server into a domain controller which authenticates and authorizes all users and computers in the domain network.
In Windows Server 2008 R2, the Initial Configuration Task (ICT) window is set to launch during startup. In case it has been closed, it can be opened by running the command “oobe.exe” in command prompt.
Configure Networking
- In the ICT window, under Provide Computer Information, click Configure networking. Right-click on Local Area Connection, select Properties.
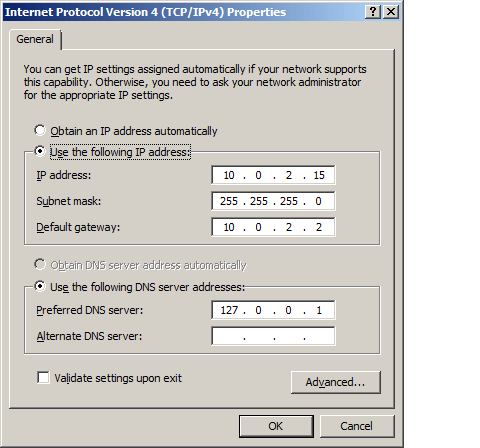
- Select Internet Protocol Version 4 (TCP/IPv4) and click Properties. Give the server a static IP and for the Preferred DNS server, it will be 127.0.0.1. Click OK when done.
Add Roles
- In the ICT window, under Customize This Server, click Add roles.
- In Add Roles Wizard, click Next to get to the Server Roles list. Check Active Directory Domain Services and a window will pop up. Click Add Required Features. Click Next, Next and Install. Click Close when done.
Setup Domain Controller
- Run the command “dcpromo.exe “. An Active Directory Domain Services Installation Wizard will pop up.
- Click Next until user see Choose a Deployment Configuration. Select Create a new domain in a new forest and click Next. Key in a name and add “.local ” after the name (e.g.: igx.local ) for a local domain and click Next.
- In Set Forest Functional Level, select Windows Server 2008 R2 and click Next.
- In Additional Domain Controller Options, make sure that DNS server is checked and click Next. A window will pop up, click Yes to continue.
- In Location for Database, Log Files, and SYSVOL, user can either change the database folder location or use the default locations. Click Next when done.
- In Directory Services Restore Mode Administrator Password, key in password of choice for Restore Mode Administrator account and click Next.
- In Summary, click Next and the installation will begin. Click Finish and click Restart Now.
Create Users
- Go to Start, Administrative Tools, select Active Directory Users and Computers.
- Expand the newly created domain on the left pane and double-click Users. All users will be displayed on the right pane. Right-click on an empty space on the right pane, select New, select User.
- Key in the details of the new user and click Next. Key in a password. User can either uncheck User must change password at next logon or leave it checked and click Next.
Setup DHCP
- Go to Start, Administrative Tools, select Server Manager.
- In Server Manager, click Roles on the left pane. On the right pane, under Roles Summary, click Add Roles and the Add Roles Wizard will appear.
- In Add Roles Wizard, click Next to get to the Server Roles list. Check DHCP Server and click Next.
- In Select Network Connection Bindings, click Next.
- In Specify IPv4 DNS Server Settings, make sure that the parent domain is the newly created domain which is cool.local. For Preferred DNS server IPv4 address, key in the server’s IP address which is 10.0.2.15 and not the localhost IP (127.0.0.1). Click Validate to check the validity of the IP. For Alternate DNS server IPv4 address, leave it empty and click Next.
- In Specify IPv4 WINS Server Settings, user can leave it as default and click Next.
- In Add or Edit DHCP Scopes, click Add on the right to add scope.
- In Add Scope pop-up window, key in the Scope name, Starting IP address, and Ending IP address. Key in the Default gateway at the bottom. Run “ipconfig” in command prompt to check the default gateway. Click OK to close the Add Scope pop-up window and get back to Add or Edit DHCP Scopes. Click Next.
- In Configure DHCPv6 Stateless Mode, check Disable DHCPv6 Stateless mode for this server and click Next.
- In Authorize DHCP Server, make sure that Use current credentials is checked and click Next.
- In Confirm Installation Selections, click Install. Click Close when done.
For client-sided configuration, see Part 2.