Using ODBC Data Sources To Connect To Microsoft SQL Express 2019 Remote Server
ODBC Data Sources is a interface that allows users to access data in any database that has an ODBC driver. There are two versions of ODBC in your computer; 32-bit and 64-bit. Depending on the version that you wish to use, you will need to download the same version of ODBC driver. Using a 32-bit ODBC driver will not work with ODBC 64-bit. Both versions are located in different locations as mentioned below.
ODBC 32-bit:
C:\Windows\syswow64\odbcad32.exe
ODBC 64-bit:
C:\Windows\system32\odbcad32.exe
An SQL Server called SQLEXPRESS will be used in this guide. In order to connect to a remote Microsoft SQL Express server, please follow these steps below.
Part 1: Configuring Microsoft SQL Express on server
-
- Open Windows Defender Firewall with Advance Security from the Start menu and add an inbound rule for TCP port 1433.
- Run SQL Server 2019 Management Studio and login to the server. Right-click the server and select Properties. Go to Security and select SQL Server and Windows Authentication Mode.

- Go to Connection and select Allow remote connection to this server.

- Restart the SQL server.
- Open SQL Server 2019 Configuration Manager.
- Expand SQL Server Network Configuration in the left pane and select Protocols for <instance name>.
- Double-click TCP/IP in the right pane to open up the TCP/IP Properties screen.

- Under the Protocol tab, set Enabled to “Yes“. Click Apply and OK.

- Click on SQL Server Services in the left pane and restart SQL Server (<instance name>).

Part 2: Configuring ODBC Data Sources
- Open ODBC Data Sources.
- Click Add to add a new data source either under User DNS tab or System DSN tab depending on your application. Select SQL Server driver and click Finish.

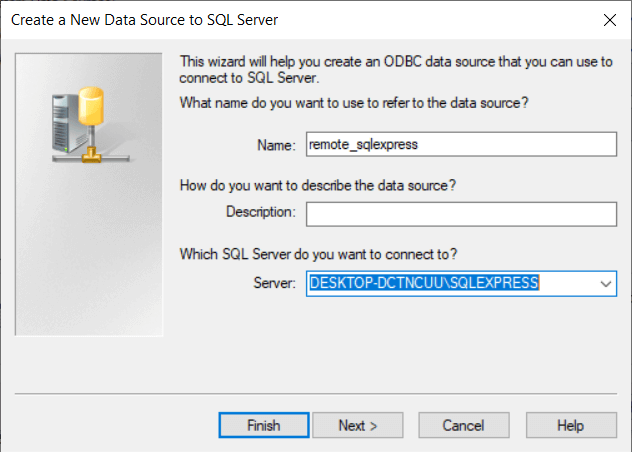
- Give the data source a name and click on the drop down box to search for the SQL server. If the SQL server is not visible, user can type the server instance manually and click Next.
- Select With SQL Server authentication using a login ID and password entered by the user. Insert the Login ID and password of the SQL server and click Next.

- Select Change the default database to to change the database. Select the preferred database and click Next.

- Click Finish.
- In the ODBC Microsoft SQL Server Setup screen, press Test Data Source to test the connection. If the connection is successful, it will say TESTS COMPLETED SUCCESSFULLY!
