Setting Up a Cluster Network
IGX Cluster Network module is designed for scaling and distributed configuration. The cluster module is divided into two parts; Cluster Master and Cluster Node. It is suitable for large scale projects with huge amount of IO tags by breaking down the tasks and distributing them across multiple nodes.

Part 1: Configuring the Cluster Master
- Firstly, create a new project with a suitable name.
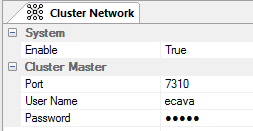
- On the Task pane, select Cluster Network. Cluster Network is set to False by default. Change it to True to enable it.
- Next, provide a Username and Password. Save. The nodes will connect to the master using this username and password.

- Go to Virtual Tag and create a tag.

Note: All master and nodes needs to have identical virtual tag to transfer data between them.
Part 2: Configuring the Cluster Node
- Similarly, create a new project with a suitable name.
- Select Cluster Network, by default, it is set to False. Change it to True to enable it.
- Insert the same username and password.
- Next, expand Cluster Network on the Task pane and select Remote Master.

- Next, create a new node entry. Insert the IP address of the Master under Host. Insert the username and password of the cluster master under Username and Password.

- Finally, create a virtual tag. Make sure that it is identical to the Master’s tag. Save and run both projects.

